The idea of rendering is to computationally produce a two-dimensional image from three-dimensional objects. These objects are captured with a certain projection onto an image plane. The projection can be abstract, like a parallel projection, or related to the human vision, like a perspective representation.
Basically, every three-dimensional representation on a digital screen is already a rendering. When we talk about rendering in the context of creating a representational image of sorts, we also mean that a scene was composed and the rendered perspective was chosen purposely. Rendering objects can be compared with taking photos of them.
The rendered image can be simple, like a drawing of the outlines, or advanced, like a photorealistic replication. Depending on our intention and computational power at hand, the rendering may take some milliseconds, minutes, or even days. This depends on computational parameters, such as resolution, antialiasing, color depth, depth of field etc. and on the introduction of light. The simulation of light with attention to refraction, reflection, transparency, and shade requires complex calculations. Specialized rendering techniques exist for different scenarios, like rasterization or ray tracing.
Before rendering and choosing one of the following methods, we have to think about the purpose of our image. Do we need a simple sketch, convey a certain idea, highlight a special part of our design, or get a prediction of the final atmosphere of our design? The production of a representation during the design process serves decision-making; we have to keep our intention in mind when we think about the extraction of our scene and its setting.
Overview of Rhino’s rendering capabilities
The default rendering has changed between Rhino 5 and 6 (and will again in Rhino 7). The following remarks are not universally transferable and assume that Rhino 6 is running.
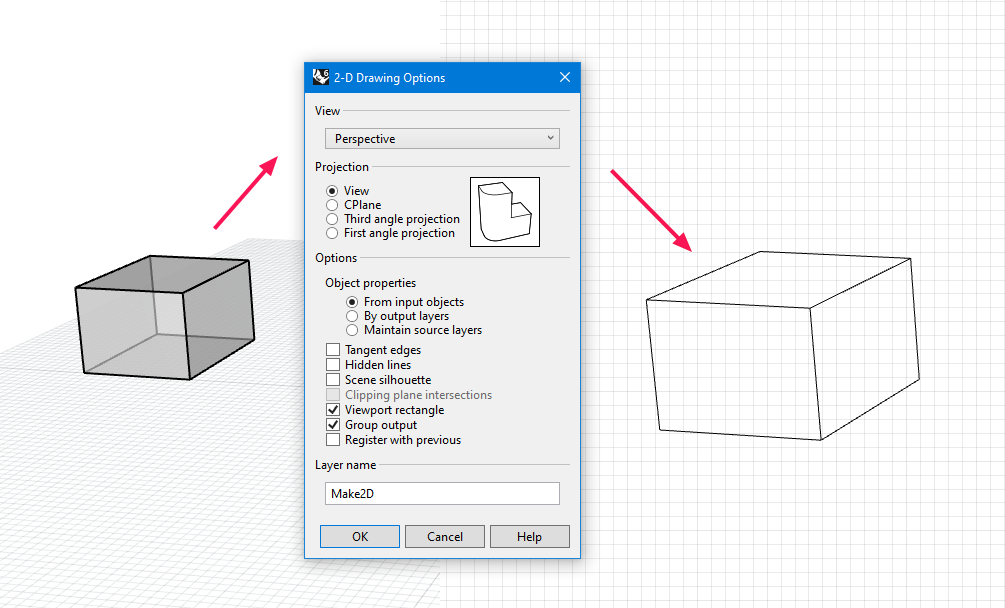
Exporting an outline sketch with Make2D
A simple and straightforward method is to use the Rhino command _Make2D. To prepare, we set a nice perspective in one of the viewports and then select our objects. After calling the command we can toggle some options and hit OK. This will create a new layer with a snapshot of our perspective view and some sublayers with the different elements. Contrary to the normal wireframe display mode, this snapshot takes into account which part of the model is actually hidden within the field of view.
The just generated snapshot is placed onto the XY plane and automatically selected. We can now switch the top viewport and click File > Export Selected… to export our image as a vector graphic. Thus, we created a nice outline drawing which could be edited further in vector graphics software.
Capturing the viewport as an image
Various display modes can be set for the viewport in Rhino and may already
render your desired look. While some modes try to imitate a sketchy drawing,
others respect your material and scene settings (see next chapter). The tutorial
Capture viewport as image
Using Rhino Render for image processing
Rhino has a built-in renderer called Rhino Render that uses material
properties and lighting to compute an image. It builds upon the general scenery
and offers some parameters for the image processing. The next chapter describes
the general procedure for rendering. To see a simple example how this can be
extended with a bit of post-processing, head over to the tutorial conceptual-rendering
Advanced rendering
While the previous methods provide decent results, they are not the gold standard of rendering. For higher demands, there is special software with the single purpose of rendering. This software may come as a Rhino plugin or as a standalone program that works with a file format that Rhino can export to. Even if they are a Rhino plugin, they may offer the assignment of proprietary materials, custom light sources and extensive scenes.
Advanced rendering is a specialty on its own and even a profession. Especially, when custom materials with distinctive textures have to be created and extensive post-processing in graphics software is carried out to create a certain mood and atmosphere. This topic is beyond the objective of this website. Visualizing Architecture, FlyingArchitecture or ronenbekerman are a good starting point for further research on this topic and will give you some ideas to improve your visual output.
Setting a scene for rendering
The following steps are just some quick notes on helpful actions. They aim for a simple rendering with the purpose to present preliminary results of the design. More information can be found in dedicated tutorials, such as the official Real-time Rendering or several YouTube videos that cover rendering with Rhino more extensively.
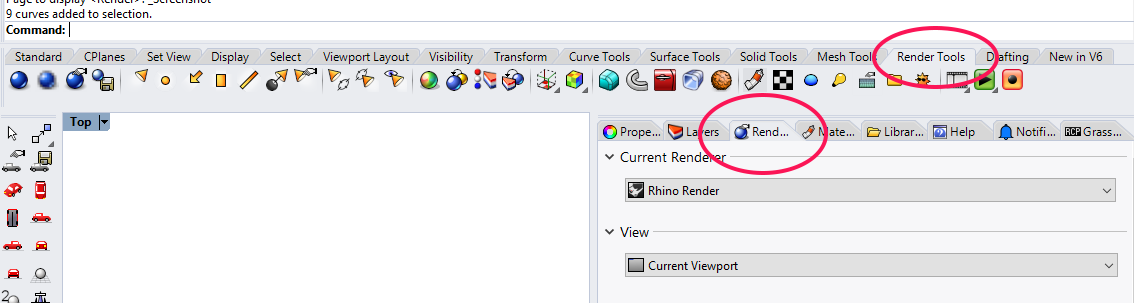
Most of the render commands can be found in the Render Tools tab and most of the settings are in the Rendering panel. Changing the settings for rendering related preferences will not only affect the actual rendering but also some display modes that built upon Rhino Render. We can render an image to see the current output by hitting the blue globe.
Assign materials and properties
Depending on our desired visual output, we might want to assign a material to an object. This can be done globally on a layer level basis or fine-tuned for each object individually. By default, each object inherits the material of its layer. We can change the layer’s default material by clicking the corresponding field in the Layers panel.
To change the material of an individual object, we select it first and then select Material in the Properties panel. The dropdown menu at top lets us pick an existing material or create a new one. Rhino already comes preinstalled with some common types that may also be altered. To load more types, click the Type dropdown, select More Types… and a new window will open. After clicking the folder icon Import From File…, we can look for whatever suits best.
Another convenient way to achieve the same result it to switch to the Libraries panel and look for a suitable material. We can then drag and drop it onto an object in the viewport.
If we have selected a material with a texture, we probably have to adjust the mapping. This is done by clicking on the texture in the Textures section of the Material tab in the Properties panel. In the next dialog we find a Mapping section. Also, there is an extra Properties tab Texture Mapping that might be useful. In addition, there are more tabs to adjust various options of the visual appearance like edge softening, displacement, or shut lining. Describing those goes beyond the scope of this website. Please visit Rhino help for an extensive explanation.
The Properties panel hosts two tabs that can ease our work if we cannot provide volumetric objects: Curve Piping and Thickness creates a body around curves and surfaces. This temporary mesh is only visible in rendered views.
Create lighting and backdrop
Next on the agenda is lighting. We can distinguish between two types in Rhino: Single light sources and environmental lighting. The latter can be found in the Rendering panel at the relating section. We can activate Sun which is directional lighting and allows us to set the lighting for a specific place and time. We can also activate Skylight which is defused lighting to make our objects appear more sculptural by adding some shadows.
In the same panel we find the section Backdrop. Here we can specify a color, gradient, or image as a background. We can also add a ground plane that our objects will cast shadows onto and which gives our scene a horizon. The backdrop and environmental lighting are combined into a Rhino environment which makes our settings portable and switching rendering settings easier.
If we want to create single and more defined light sources, we find them in the Render Tools tab. After clicking on one, we can draw its position and orientation in the viewport. When we select a light in the viewport, we can switch in the Properties panel to the Light tab and change the settings of our light source.
Set view
The last step is to set the perspective for rendering. This is done in the Rhino viewport where we manipulate the view until we are satisfied. We find some helpful commands for changing the view in the tab Set view. We can, for example, switch from a perspective to a parallel projection or two-point perspective and numerically back viewing angle and camera position. Visualizing Architecture offers a tutorial for the artistic aspects of composing a perspective. In the Properties panel we can, if nothing is selected, select the Safe Frame tab and active some guiding lines to make the composition easier.
Once we have settled and got our perfect angle, we should save it. Yes, it happens pretty fast that we change the view for some other task. We save the view by calling the command _NamedView or clicking the corresponding button. We can then click the floppy disk Save As… to save and name our view. Subsequently, a thumbnail is created and we can double-click it to restore our view when needed.