This page covers the installation of Grasshopper and plugins for Grasshopper. Grasshopper itself is a Rhino plugin, so if you have not already done so, you need to install Rhino first. Depending on the version of Rhino, Grasshopper is either already included or needs to be installed manually. Unlike Rhino itself, Grasshopper is only available in English.
To create the content for this website, we use Grasshopper 1.0 or higher, which comes preinstalled with Rhino 6 and 7. Compared to Grasshopper for Rhino 5, there are minor feature additions, but all tutorials should work just as well with Rhino 5. If the backwards compatibility is not given, we point this out. If you run into unexpected compatibility problems, please create an issue or write an email to .
Grasshopper for Rhino 6 and 7 (Windows)
When you install Rhino 6 or 7, Grasshopper is already included and does not need to be installed separately. It can be started by either clicking the Grasshopper button or by typing Grasshopper into the command prompt.

Grasshopper for Rhino 5 (Windows)
If you have Rhino 5 installed, you need to install Grasshopper manually. Download the installation file and follow the instructions. Afterward you start Grasshopper by typing Grasshopper into the command prompt.
Grasshopper for Rhino (Mac)
Grasshopper is already included in Rhino 5 for Mac and all newer versions. You start Grasshopper by typing Grasshopper into the Command Search; you can type the letters directly on the keyboard while Rhino is active and nothing is selected.
Troubleshooting
If you encounter any problem when installing Grasshopper or Rhino, please contact the official support or consult the forum.
Installing plugins for Grasshopper
When writing algorithms in Grasshopper, we are not limited to the components that are delivered with Grasshopper itself, but it’s possible to install additional plugins for Grasshopper. The website Food4Rhino has most of the plugins in store. Note however that not all plugins are available for Mac. While some plugins add only a few components that integrate into the existing tabs, other provide a whole range of components in their own tabs.
As diverse as the plugins are, so are their installation routines. Usually, each plugin has a README file with instructions. However, there are three common options:
1. Install using an installer
Some plugins come with their own installation file. Execute the installer, double-check the installation path and follow the instructions. Afterward the plugin should appear somewhere in your Grasshopper component ribbon.
2. Install by copying into the Components Folder
Many plugins are downloaded as *.gha files, which do not need an installation. Simply copy the required files into the Components Folder. To find this folder, click on File > Special Folders > Components Folder and open it. If a *.rhi file (Rhino plugin) is included, it can be installed by executing it or using drag & drop onto an active Rhino window.
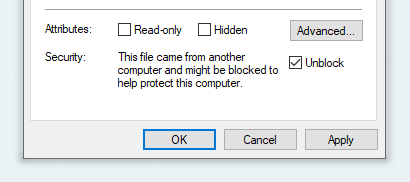
Watch out: in Windows, a *.gha file that was downloaded directly from the internet may be locked by the operating system. To unlock it, you need to select its Properties from the context menu and check Unblock. Otherwise, it will not be loaded by Grasshopper even if it is in the correct folder.
If a plugin that you just installed cannot be found in Grasshopper, you should first check if all the files, which are associated with the plugin, were unblocked.
In addition to the Components Folder mentioned above, Rhino 6 ships with a
second one (in Windows located at
%AppData%\Roaming\Grasshopper\6\Libraries).
Stay organized: The files that belong to a plugin do not need to be located directly in the Components Folder, but can also be stored in a subfolder. It’s recommended to place each plugin into its own subfolder.
A few packages also ship with a folder named UserObjects. This folder is not copied to the Components Folder (Libraries) but its content needs to be placed in the User Object Folder (UserObjects). Its location can be found at File > Folders > User Object Folder.
3. Install via package manager
The Rhino Package Manager is now part of Rhino 7 and will eventually become the standard procedure for installing plugins in the future. At the moment, there are just a few plugins available. However, food4Rhino will, if a Yak package of a plugin was set up, show a link with which the plugin can be directly installed from the package manager.
To open Rhino’s package manager, type PackageManager into the
command prompt.